Setup IPTV on Raspberry Pi: Your Ultimate DIY Guide
Learn to setup IPTV on Raspberry Pi with our comprehensive guide. Transform your device into a powerful streaming media center!
Welcome to the most exhaustive, comprehensive, and up-to-date guide on setting up your own IPTV media center using a Raspberry Pi. In the era of digital streaming, cord-cutting has become less of a trend and more of a global standard. While many users opt for off-the-shelf solutions, tech enthusiasts, hobbyists, and privacy advocates know that nothing beats the flexibility, power, and open-source nature of a Raspberry Pi.
By the time you finish reading this monumental 3000+ word guide, you will be equipped with expert-level knowledge on hardware selection, operating system installation, Kodi configurations, network optimization, and advanced troubleshooting. Whether you are using a legacy Raspberry Pi 3 or the powerhouse Raspberry Pi 5, this tutorial is tailored to help you build the ultimate bespoke entertainment system.
Let’s dive into the fascinating world of DIY streaming and unlock the true potential of your microcomputer. Don't forget to check out our Homepage to learn more about our premium streaming services.
1. The Raspberry Pi Revolution in Home Entertainment
The Raspberry Pi was initially conceived as a humble, low-cost educational tool designed to promote the teaching of basic computer science in schools and developing countries. However, its small footprint, incredible versatility, and robust GPIO (General Purpose Input/Output) capabilities quickly caught the attention of the maker community and home theater enthusiasts.
The Shift to Micro-Computing Media Centers
Before the Raspberry Pi, building an HTPC (Home Theater PC) required a bulky desktop chassis, loud cooling fans, expensive graphics cards, and a hefty electricity bill. The Raspberry Pi disrupted this entirely. Drawing mere watts of power and fitting inside the palm of your hand, it is capable of decoding high-definition video, outputting flawless audio, and running complex user interfaces—all silently and continuously.
Why Choose a Raspberry Pi for IPTV?
You might be wondering, why go through the effort of building a Raspberry Pi IPTV box when commercial products are readily available?
- Total Control & Customization: Unlike locked-down proprietary devices, a Pi allows you to tweak every parameter of your media experience. You can change the skin, modify backend codes, and strip away bloatware.
- No Native Advertisements: Off-the-shelf streaming sticks are increasingly littered with unskippable ads and sponsored content on their home screens. A dedicated Raspberry Pi OS runs only what you tell it to run.
- Privacy First: You own the hardware and the software stack. Your viewing habits aren't being scraped and sold to data brokers.
- Multi-Functional Powerhouse: When you aren't streaming, your Pi can double as a network-attached storage (NAS) device, a retro gaming console, or an ad-blocking Pi-Hole.
- Cost-Effective Scalability: You can easily upgrade your setup by swapping out the microSD card or attaching an external SSD without replacing the entire unit.
For users looking to pair their new hardware setup with a top-tier streaming source, our premium IPTV Subscription offers unparalleled channel variety and stability, perfectly suited for custom Pi builds.
2. Hardware Requirements for a Flawless IPTV Box
Building the perfect Raspberry Pi IPTV system starts with selecting the right hardware. Not all Raspberry Pi models are created equal, and your choice will directly impact boot times, menu fluidity, and streaming resolution capabilities.
Choosing Your Raspberry Pi Model
| Raspberry Pi Model | RAM Options | Max Resolution | Best Use Case for IPTV | Verdict |
|---|---|---|---|---|
| Raspberry Pi 5 | 4GB / 8GB | Dual 4K @ 60Hz | Hardcore 4K streaming, multi-tasking, heavy Kodi skins. | The Ultimate Choice |
| Raspberry Pi 4 Model B | 2GB / 4GB / 8GB | Dual 4K @ 60Hz | Standard 4K and 1080p IPTV streaming, highly reliable. | The Sweet Spot |
| Raspberry Pi 3 Model B+ | 1GB | 1080p @ 60Hz | Budget-friendly 1080p streaming. Struggles with heavy skins. | Good for Beginners |
| Raspberry Pi Zero 2 W | 512MB | 1080p @ 30Hz | Ultra-compact, hidden TV builds, basic lightweight IPTV. | Niche/Travel Use |
[!TIP] Memory Matters: If your sole intention is to run a lightweight OS like LibreELEC strictly for IPTV, 2GB of RAM is entirely sufficient. However, if you plan to run Raspberry Pi OS (a full desktop) with a web browser in the background, 4GB or 8GB is highly recommended.
Essential Components and Peripherals
To ensure your system runs smoothly 24/7 without thermal throttling or data corruption, you need high-quality accessories:
- MicroSD Card (The Heart of the System): Do not cheap out here. The OS and all caching happen on this card. Look for an Application Class 2 (A2) card, such as the SanDisk Extreme or Samsung EVO Select. A capacity of 32GB to 64GB is perfect.
- Robust Power Supply: The Raspberry Pi 4 and 5 require a stable 5V/3A or 5V/5A USB-C power supply, respectively. Using standard phone chargers will result in low-voltage warnings (the dreaded lightning bolt icon) and severe CPU throttling.
- Cooling Solution: Streaming high-definition video requires sustained processing power. If your Pi overheats, it will slow down to prevent damage, causing your IPTV stream to buffer. Invest in a case with a built-in heatsink and a quiet cooling fan (e.g., the Flirc Aluminum Case or Argon ONE).
- Micro-HDMI to HDMI Cable: For Pi 4 and Pi 5 models, you will need a specialized micro-HDMI cable to connect to your television.
- Control Interfaces: You can navigate your new media center using a standard USB keyboard/mouse, a specialized mini wireless keyboard, or even your existing TV remote using HDMI-CEC technology.
3. Essential Software Prerequisites
Before we flash the OS, let’s ensure you have all the necessary digital tools and services ready to go. Having these prepared will make the installation process seamless.
A High-Quality IPTV Subscription
Hardware is only half the battle; the content delivery relies entirely on your IPTV provider. You will need an active subscription that provides you with an M3U Playlist URL or an Xtream Codes API login.
If you are tired of buffering, missing channels, and poor customer support, explore our Pricing plans to secure a premium connection that delivers pure, uncompressed high-definition streams directly to your Pi.
Electronic Program Guide (EPG)
An M3U file gives you the channels, but an EPG (usually provided as an XMLTV URL) gives you the beautiful, intuitive grid interface showing what programs are currently airing and what is coming up next. Smartiflix subscriptions come fully equipped with high-accuracy EPG data.
Network Requirements
For the best IPTV experience, stable internet is paramount. While the Pi 4 and 5 have excellent dual-band Wi-Fi, it is always recommended to hardwire your Pi directly to your router or network switch using a Cat 6 Ethernet cable. Wi-Fi signals are subject to interference, which is the leading cause of stream buffering.
4. Choosing the Ultimate Operating System for IPTV
Unlike commercial streaming boxes that lock you into one ecosystem, the Raspberry Pi gives you absolute freedom to choose your operating system based on your technical comfort level and desired user interface.
Option A: LibreELEC (Just Enough OS for Kodi)
Best for: A pure, appliance-like media center experience.
LibreELEC is a lightweight "JeOS" (Just enough Operating System) designed with one singular purpose: to run Kodi. It boots incredibly fast, uses minimal system resources, and drops you straight into the Kodi interface without any desktop environment in the background. If you want your Raspberry Pi to feel exactly like a dedicated set-top box, this is your best option.
Option B: OSMC (Open Source Media Center)
Best for: Users who want Kodi but also want to access an underlying Debian Linux ecosystem.
OSMC takes a different approach. It heavily modifies the Kodi interface with its own beautiful, minimalist skin. Under the hood, it retains a full Debian-based operating system, allowing advanced users to SSH into the Pi and install other Linux packages (like a VPN client, torrent daemon, or ad-blocker) alongside the media center.
Option C: Raspberry Pi OS (Desktop Environment)
Best for: Users who want a fully functional personal computer that also plays IPTV.
If you plan to use your Pi for web browsing, office work, or learning to code, you should install the official Raspberry Pi OS. You can still install media players like VLC or a standalone Kodi application directly onto the desktop, though it won't offer the seamless "appliance" feel of LibreELEC.
Option D: Android TV (LineageOS/KonstaKANG)
Best for: Users deeply ingrained in the Android ecosystem who want a UI identical to modern smart TVs.
Through community builds (like KonstaKANG’s LineageOS), you can flash a custom version of Android TV onto your Raspberry Pi 4 or 5. This allows you to install native Android IPTV APKs (like Tivimate or IPTV Smarters) straight from the Google Play Store.
[!NOTE] For the core of this guide, we will focus heavily on the LibreELEC / Kodi route, as it offers the absolute highest performance, the lowest hardware overhead, and the most robust handling of massive M3U playlists.
5. Step-by-Step: Flashing Your MicroSD Card
With your hardware acquired and your OS chosen, it is time to write the operating system to your microSD card.
Step 1: Download the Imager Tool Head over to the official Raspberry Pi website and download the Raspberry Pi Imager software. It is available for Windows, macOS, and Linux.
Step 2: Connect Your SD Card Insert your microSD card into your computer using an SD card reader.
Step 3: Select the Operating System Open the Raspberry Pi Imager.
- Click "Choose OS".
- Scroll down to "Media player OS".
- Select "LibreELEC" (or OSMC, if you prefer).
- Choose the exact version that matches your hardware (e.g., LibreELEC for Raspberry Pi 4).
Step 4: Select Your Storage
- Click "Choose Storage".
- Carefully select your inserted microSD card. Double-check the drive letter to ensure you do not accidentally overwrite another drive on your computer!
Step 5: Configure Advanced Settings (Optional but Recommended) In the newer versions of the Imager, you can click the gear icon before flashing to pre-configure network settings.
- Check "Enable SSH" and set a password. This is incredibly useful for remote troubleshooting later.
- Configure your Wi-Fi SSID and password if you aren't using Ethernet.
Step 6: Write and Verify Click "Write". The software will download the OS image, format your card, write the data, and then verify the integrity of the file system. This process usually takes 2 to 5 minutes.
Once complete, safely eject the microSD card, insert it into your Raspberry Pi, connect the HDMI cable to your TV, plug in the power supply, and watch your new media center spring to life.
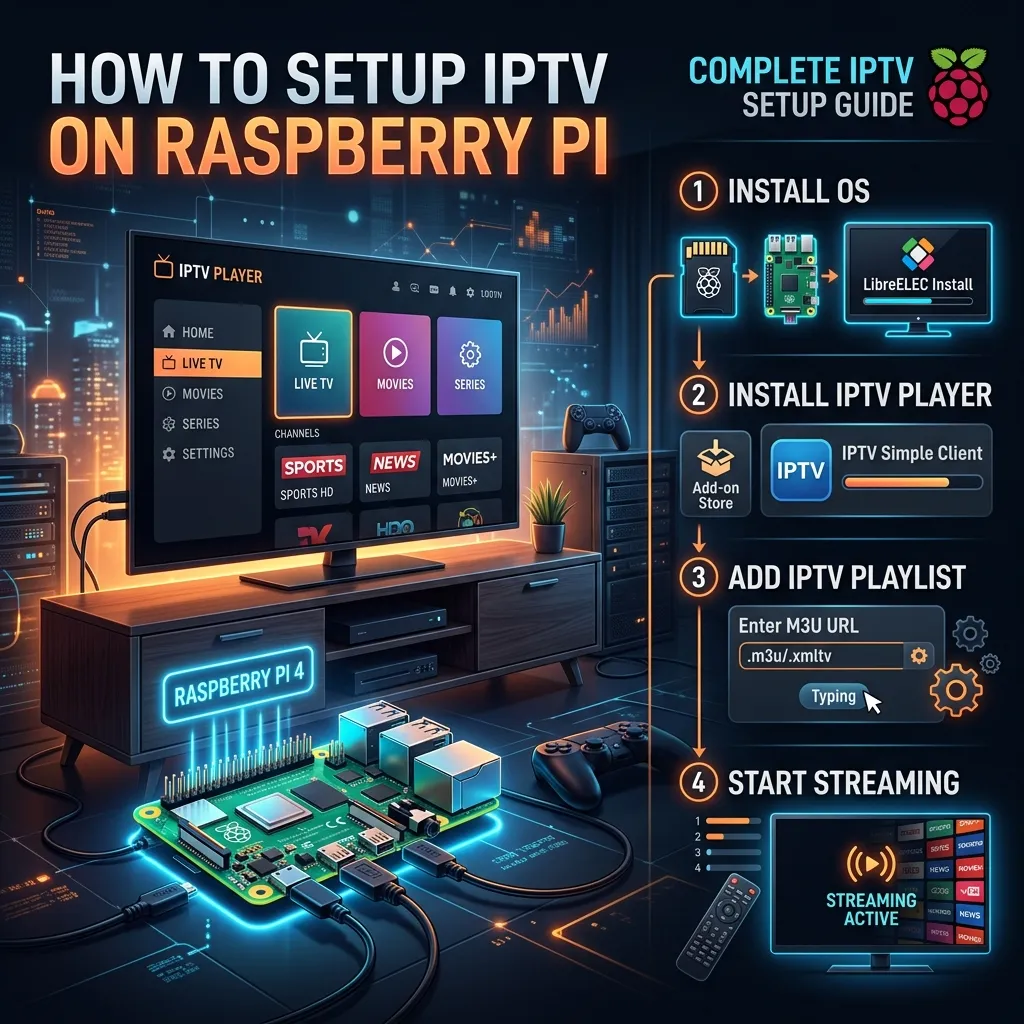
6. Method 1: The Ultimate Kodi IPTV Setup via LibreELEC
Kodi is, without a doubt, the most powerful media center software on the planet. Its true power lies in its vast ecosystem of add-ons. To watch IPTV on Kodi, we will use an official PVR (Personal Video Recorder) client.
Step 1: Initial LibreELEC Setup
Upon the first boot, LibreELEC will display a welcome wizard.
- Choose your system language and hostname.
- Connect to your Wi-Fi network (if you aren't hardwired).
- Enable SSH and Samba (SMB) sharing. This allows you to easily transfer files from your computer to the Pi over the network.
- Click "Next" until you arrive at the main Kodi home screen.
Step 2: Installing the PVR IPTV Simple Client
By default, Kodi does not know how to handle live TV or M3U files. We need to install the bridge that makes it possible.
- From the Kodi home screen, navigate to the left-hand menu and select Add-ons.
- Click the open box icon (Package Installer) located at the top left of the screen.
- Select Install from repository.
- Choose Kodi Add-on repository.
- Scroll down and select PVR clients.
- Scroll through the alphabetical list until you find PVR IPTV Simple Client.
- Click it, and select Install. (If prompted to install additional dependencies, click "OK").
Step 3: Configuring Your IPTV Subscription
Now that the add-on is installed, we must configure it with the credentials provided by your IPTV provider.
- Once installed, the add-on menu will pop up. Click on Configure.
- In the General tab:
- Locate Location and ensure it is set to Remote Path (Internet Address).
- Click on M3U Play List URL.
- A keyboard will pop up. Carefully type in the exact M3U link provided to you upon subscribing. Make sure there are no typos, as URLs are case-sensitive.
- Click "OK".
- In the EPG Settings tab (to get your TV Guide):
- Set Location to Remote Path (Internet Address).
- Click on XMLTV URL and enter the EPG link provided by your service.
- Click "OK".
- In the Catchup tab:
- If your subscription supports catch-up (the ability to watch programs that aired earlier in the day), enable it here and configure the query format based on your provider's instructions.
- Click OK to save all settings for the PVR IPTV Simple Client.
Step 4: Activating Live TV
- Kodi will prompt you that a restart is needed for the PVR client to load, or it may automatically ask if you want to enable the PVR. If it doesn't, manually restart your Raspberry Pi.
- Upon rebooting, look at the top right corner of your screen. You will see a notification saying "PVR Manager is starting up" and a progress bar loading channels and EPG data. If you have a massive playlist (e.g., 50,000+ VODs and channels), this initial load might take a minute.
- Once fully loaded, navigate to the main Kodi home screen and click on TV.
- You will now see your fully populated list of channels, complete with logos, program descriptions, and categories.
[!IMPORTANT] Handling Massive Playlists: High-quality IPTV providers offer tens of thousands of channels and VODs. This can sometimes crash lower-end Raspberry Pis (like the Pi 3). To prevent this, use an M3U editor tool online or request your IPTV provider to prune the list, removing countries or languages you do not watch.
For more diverse setup instructions on other hardware, feel free to reference our general Installation Guide.
7. Method 2: Setting up IPTV using OSMC
If you opted for OSMC instead of LibreELEC, the fundamental architecture is similar, but the user interface and underlying possibilities are different. OSMC boots into a highly customized, sleek, and vertically scrolling skin that looks exceptionally modern.
The OSMC Setup Process
- Flash OSMC to your SD card using the Raspberry Pi Imager.
- Connect to your TV and power on. OSMC will run a slightly longer initialization script as it configures the Debian file system.
- Follow the gorgeous on-screen setup wizard to configure networking and timezones.
- Installing the PVR: In OSMC, navigate to Settings > Add-on Browser > Install from Repository > PVR Clients > PVR IPTV Simple Client.
- The configuration steps for the M3U and EPG are identical to the Kodi/LibreELEC instructions detailed above.
Why choose OSMC? Advanced Debian Tools
Because OSMC is a full Debian Linux distribution beneath the Kodi surface, you can easily SSH into the Pi using an application like PuTTY (Windows) or Terminal (Mac/Linux).
# Example of SSHing into an OSMC box
ssh osmc@192.168.1.100
# Default password is usually 'osmc'
Once logged in, you can use standard Linux package managers (apt-get) to install background services. For instance, you could install a dynamic DNS updater, a cron job to automatically reboot the Pi nightly at 4 AM to clear the cache, or an instance of Docker to run lightweight home automation scripts.
8. Method 3: Desktop Linux & VLC Media Player
For those who treat their Raspberry Pi strictly as a miniature desktop computer running Raspberry Pi OS (formerly Raspbian), you don't need a heavy media center interface like Kodi. You can simply use VLC, the legendary open-source media player.
VLC is extraordinarily lightweight and perfectly handles network streaming protocols like HTTP, RTSP, and M3U playlists.
Installing VLC on Raspberry Pi OS
Open the terminal on your Raspberry Pi desktop and run the following commands to ensure your system is up to date and VLC is installed:
sudo apt update
sudo apt upgrade -y
sudo apt install vlc -y
Loading Your IPTV Playlist in VLC
- Open VLC Media Player from the application menu (usually under 'Sound & Video').
- Click on Media in the top menu bar.
- Select Open Network Stream... (or press Ctrl+N).
- In the network URL box, paste your full M3U link provided by your IPTV subscription.
- Click Play.
- To view the list of channels, click on View > Playlist (or press Ctrl+L). You can use the search bar within the playlist window to quickly find specific channels.
Automating VLC on Boot
If you want your Pi to act as a digital signage display or a dedicated TV that auto-plays a specific news channel upon receiving power, you can configure VLC to launch on boot via the command line:
- Open terminal and edit the autostart file:
nano ~/.config/lxsession/LXDE-pi/autostart - Add the following line to the bottom:
@vlc http://YOUR-IPTV-LINK-HERE --fullscreen - Save and exit (Ctrl+X, then Y). Now, whenever the Pi boots, it automatically launches into full-screen IPTV streaming.
9. Advanced Configuration: Network Optimization & Security
Streaming live television, especially uncompressed 4K or 60fps sports, requires massive, sustained data throughput. If your network isn't optimized, you will experience buffering, micro-stutters, and audio desynchronization.
Overcoming ISP Throttling and Ensuring Privacy
One of the most critical aspects of IPTV streaming is securing your data connection. Many Internet Service Providers (ISPs) actively monitor user traffic. If they detect sustained, heavy UDP/TCP video streams (characteristic of IPTV), they may forcefully throttle your bandwidth, causing agonizing buffering during peak hours or major sporting events.
To bypass this artificial speed limit, you must encrypt your traffic. To learn everything about securing your streaming activities, read our comprehensive Security Guide.
Installing a VPN on your Raspberry Pi: If you are using LibreELEC, the easiest way to install a VPN is via the Zomboided VPN Manager add-on.
- Download the Zomboided repository zip file on your PC and transfer it to your Pi via USB or SMB.
- In Kodi, go to Add-ons > Install from zip file and install the Zomboided repo.
- Go to Install from repository > Zomboided Add-on Repository > Services > VPN Manager for OpenVPN.
- Configure the add-on with your premium VPN provider's credentials. The plugin supports major providers like ExpressVPN, NordVPN, Surfshark, and PIA out of the box.
Ethernet vs. Wi-Fi
As stated earlier, hardwiring your Raspberry Pi is non-negotiable for serious streaming.
- Wi-Fi Constraints: 2.4GHz Wi-Fi is heavily congested by bluetooth devices, microwaves, and neighbors' networks. 5GHz Wi-Fi is faster but struggles to penetrate walls.
- Ethernet Supremacy: The Raspberry Pi 4 and 5 feature true Gigabit Ethernet controllers. Plugging a Cat 6 cable directly from your router to your Pi ensures near-zero packet loss and a remarkably stable streaming ping.
Kodi AdvancedSettings.xml Tweak (Fixing Buffering)
Kodi, by default, is conservative with how much RAM it uses for caching video. Since a modern Raspberry Pi has gigabytes of RAM, we can force Kodi to cache more of the video stream ahead of time, entirely eliminating minor buffering hiccups.
You must create an advancedsettings.xml file and place it in your Pi’s Userdata folder (/storage/.kodi/userdata/ on LibreELEC).
Create a text file with the following code:
<advancedsettings>
  <cache>
    <memorysize>209715200</memorysize>  <!-- Sets cache size to roughly 200MB -->
    <buffermode>1</buffermode>          <!-- Buffers all files, including local and internet -->
    <readfactor>5.0</readfactor>        <!-- Multiplies the read rate; fetches data 5x faster -->
  </cache>
</advancedsettings>
Transfer this file to your Pi and reboot. You will notice significantly smoother playback on demanding channels.
10. Hardware Enhancements and Quality of Life
Your Raspberry Pi is functional, but let's make it a joy to use on a daily basis.
Controlling the Pi with Your Existing TV Remote (HDMI-CEC)
You do not need an extra keyboard cluttering your coffee table. The Raspberry Pi natively supports HDMI-CEC (Consumer Electronics Control). This protocol allows your television to send remote control signals straight down the HDMI cable into the Pi.
- Ensure your Pi is connected to a CEC-compatible HDMI port on your TV (usually labeled CEC, Anynet+, Simplink, or Bravia Sync depending on the manufacturer).
- Go into your TV's main settings menu and ensure CEC functionality is turned ON.
- Once enabled, you can pick up your standard TV remote and immediately use the directional arrows, OK, and Back buttons to navigate the Kodi interface effortlessly.
The FLIRC USB Receiver
If your TV does not support HDMI-CEC, or if it is incredibly laggy, your best hardware investment is a FLIRC USB dongle. This brilliant little device plugs into the Pi's USB port and can "learn" infrared commands from literally any remote control in your house (an old DVD remote, an unused soundbar remote, etc.). You program it once on your PC, plug it into the Pi, and LibreELEC instantly recognizes it as a standard keyboard.
Monitoring Thermal Performance
Streaming heavy video files can cause the tiny CPU to run hot. If you see a small thermometer icon appear in the top right corner of your screen, your Pi is thermal throttling. To check the exact temperature of your Pi via SSH, run:
vcgencmd measure_temp
To maintain maximum performance, ensure you are using an aluminum case that acts as a giant passive heatsink, drawing heat away from the Broadcom chip.
11. Troubleshooting Common Raspberry Pi IPTV Errors
Even with a perfect setup, technology can sometimes be stubborn. Here is an exhaustive list of common issues and exactly how to resolve them.
Issue 1: The Pi displays a Lightning Bolt icon, and performance is terrible.
- Cause: Low voltage. The Pi is not receiving enough power.
- Fix: Throw away the cheap phone charger. Purchase the official Raspberry Pi 15W (for Pi 4) or 27W (for Pi 5) USB-C power supply. Using a thick, high-quality USB-C cable is also mandatory.
Issue 2: Kodi crashes back to the main menu immediately upon opening a channel.
- Cause: The M3U list is too large and the Pi ran out of memory trying to parse the EPG, OR the channel codec is unsupported.
- Fix: Reboot the Pi. If it persists, use an M3U editor tool to trim your channel list down to just the countries and categories you actually watch.
Issue 3: Video plays smoothly, but there is absolutely no sound.
- Cause: Audio passthrough configuration error, or Kodi is pushing audio to the analog headphone jack instead of HDMI.
- Fix: In Kodi, navigate to Settings (Gear Icon) > System > Audio. Ensure the "Audio output device" is set to PI: HDMI. If you are using a soundbar or AV receiver, scroll down and enable "Allow passthrough" so your receiver decodes the Dolby/DTS signal instead of the Pi.
Issue 4: EPG (TV Guide) is completely blank or says "No Information available."
- Cause: The XMLTV link is typed incorrectly, the provider's EPG server is temporarily down, or the timezone shift is wildly inaccurate.
- Fix: Double-check the URL string exactly as provided. In the PVR IPTV Simple Client settings, you can also force a manual "Clear Data" under Settings > PVR & Live TV > Guide > Clear data. This forces Kodi to download a fresh copy of the XMLTV file on the next boot.
12. Raspberry Pi vs Alternative Devices
Before concluding this massive guide, it is worth exploring how the Raspberry Pi stacks up against other popular devices in the market. How do you know if you made the right choice?
Raspberry Pi vs. Amazon Firestick
The Firestick is undeniably the most popular consumer streaming device. It is cheap, highly portable, and very user-friendly. If you are looking for simplicity and portability, you might prefer setting up IPTV on a Fire device. We have an extensive, dedicated Firestick Setup guide for exactly that.
- Firestick Pros: Plug-and-play, remote included, inexpensive.
- Raspberry Pi Pros: No Amazon bloatware, no home screen ads, infinitely customizable UI, far superior storage expansion via USB, capable of running full desktop environments, built-in Gigabit ethernet (on Pi 4/5).
Raspberry Pi vs. Dedicated Android TV Boxes (Nvidia Shield)
The Nvidia Shield is the undisputed king of commercial Android TV hardware.
- Nvidia Shield Pros: Unmatched AI upscaling for lower-resolution streams, natively supports Netflix/Prime Video in 4K HDR (something Linux/Pi struggles with due to DRM restrictions).
- Raspberry Pi Pros: Half the cost (even with accessories), more satisfying for DIY enthusiasts, dual-purpose (can run web servers, Docker, RetroPie simultaneously).
Ultimately, if your primary goal is a clean, ad-free, totally private, hyper-customized IPTV interface, the Raspberry Pi running LibreELEC stands tall against devices costing three times as much.
13. Frequently Asked Questions (FAQ)
To make this guide truly encyclopedic, we have compiled the most frequently asked questions regarding the Raspberry Pi and IPTV.
Q: Is it legal to stream IPTV on a Raspberry Pi? A: The Raspberry Pi is simply a computer. Kodi and VLC are simply software media players. Using them is 100% legal. The legality of IPTV depends entirely on the content being streamed and the licensing of your IPTV provider. Always ensure you are compliant with your local digital broadcasting laws.
Q: Can I watch Netflix, Amazon Prime, or Disney+ on a Raspberry Pi alongside my IPTV? A: Yes, but it requires some extra configuration. Because these services use Widevine DRM (Digital Rights Management) protection, standard Kodi cannot play them natively. However, you can install specialized Kodi add-ons (like the unofficial Netflix add-on) and Kodi will prompt you to download the necessary Chrome OS Widevine extraction libraries to make it work.
Q: How do I update my IPTV channels? A: If your provider adds new channels to their M3U URL, Kodi will automatically detect and import them every time you restart the device. You do not need to manually edit anything once the initial setup is complete.
Q: Why does my screen resolution look weird or cut off at the edges? A: This is known as "Overscan." Historically, CRT televisions pushed the image past the physical edge of the glass. Some modern TVs still do this by default. To fix it, grab your TV remote and look for a setting called "Picture Size," "Aspect Ratio," or "Just Scan," and set it to 16:9 or "Fit to Screen." Alternatively, you can calibrate the screen directly within Kodi’s display settings.
Q: Do I need to buy a cooling fan for my Pi? A: If you have a Raspberry Pi 3 or Pi Zero, a simple passive heatsink is enough. If you have a Raspberry Pi 4 or 5 and plan on watching high-bitrate 1080p/4K content, an active cooling fan or a heavy aluminum case is strongly recommended to prevent thermal throttling.
14. Conclusion & Final Thoughts
Setting up an IPTV media center on a Raspberry Pi is one of the most rewarding DIY tech projects you can undertake. You have taken an affordable, credit-card-sized piece of silicon and transformed it into a world-class, completely uncensored, ultra-powerful home entertainment hub.
By following this guide, you have mastered the hardware requirements, selected the perfect operating system in LibreELEC, configured the mighty Kodi ecosystem, optimized your network to defeat ISP throttling, and learned how to troubleshoot like an expert.
Your hardware is now primed and ready. To fully realize the potential of your newly built super-machine, it deserves a stream of the highest possible quality. Experience zero buffering, crystal-clear 4K channels, and an exhaustive library of VODs by exploring our IPTV Subscription packages today.
If you have other televisions in the house that need connecting, remember to browse our comprehensive overall Installation Guide to get all your devices synced and streaming flawlessly. Welcome to the future of television—enjoy your incredible new Raspberry Pi media center!