Change DNS Settings for Faster IPTV Streaming: Complete Guide
Discover how to change DNS for faster IPTV streaming. Follow our step-by-step guide to optimize your settings and enjoy buffer-free viewing experience.
If you are an avid IPTV user, you are probably familiar with the frustration of your stream freezing right in the middle of an intense sports match, a crucial movie scene, or breaking news. While many users immediately blame their internet speed or their IPTV provider, the actual culprit behind constant buffering and slow channel loading times is often something much less obvious: your DNS settings.
Changing your DNS (Domain Name System) is one of the most effective, yet frequently overlooked, methods for drastically improving your IPTV streaming performance. In this massive, comprehensive guide, we will dive deep into everything you need to know about DNS, how it impacts your streaming experience, and step-by-step instructions on how to change your DNS settings across every major streaming device to unlock blazing-fast speeds.
By the time you finish reading this masterclass, you will be fully equipped to banish buffering for good and get the absolute most out of your IPTV Subscription from the Smartiflix Homepage.
1. What Exactly is DNS and Why Does it Matter?
Understanding the Internet's Phonebook
To understand why DNS is so critical for streaming, you first need to understand what it does. DNS stands for Domain Name System. Often referred to as the "phonebook of the internet," DNS translates human-readable domain names (like smartiflix.com or iptv-server-url.com) into machine-readable IP addresses (like 192.168.1.1 or 104.21.43.12).
When you type a website URL into your browser, or more importantly, when your IPTV app tries to connect to a streaming server portal via an Xtream Codes API or M3U playlist, your device doesn't know where that server is physically located. It sends a request to a DNS server, asking for the exact IP address associated with that domain. The DNS server looks up the IP address and sends it back, allowing your device to make the connection.
Every single time you load a webpage, send an email, or switch a channel on your IPTV service, a DNS request is made. If the DNS server is slow to respond, your entire internet experience slows down.
Default ISP DNS vs. Third-Party DNS
By default, when you sign up for an internet package, your Internet Service Provider (ISP)—whether that's Comcast, AT&T, BT, Sky, Virgin Media, Spectrum, or anyone else—assigns you their own default DNS servers automatically via DHCP.
Here is the harsh reality that ISPs do not want you to know: ISP default DNS servers are notoriously terrible. They are typically:
- Slow and Unoptimized: ISPs do not invest heavily in maintaining optimized, high-speed DNS infrastructure. They provide the bare minimum required for basic web browsing.
- Overcrowded: Millions of users on the same ISP are hitting the same regional DNS servers simultaneously, especially during peak evening hours (usually between 7 PM and 11 PM), leading to massive congestion.
- Censored and Blocked: Many ISPs actively block certain websites or IPTV portals at the DNS level. If your IPTV portal suddenly stops working during a big football match, it is highly likely your ISP implemented a temporary DNS block.
- Monitored: ISPs log your DNS queries to track your browsing habits, which they may sell to advertisers or hand over to regulatory bodies.
The Direct Impact on IPTV Streaming
IPTV relies on continuous, real-time data packet delivery. Unlike Netflix or YouTube, which can pre-buffer minutes of video in advance, Live TV requires real-time downloading. When you switch a channel on your IPTV app, the app queries the DNS to find the nearest, fastest streaming server for that specific broadcast.
If you are using a slow ISP DNS server, that lookup takes significantly longer. Furthermore, standard ISP DNS servers often route your traffic through inefficient, congested pathways. This leads to several massive problems:
- Longer Channel Zap Times: It takes several seconds for a new channel to start playing when you flip through the guide.
- Micro-Stuttering: Brief pauses, audio desyncs, or robotic artifacting in the video as the device struggles to maintain the connection.
- Severe Buffering: The dreaded spinning circle appears because the video data isn't reaching your device fast enough to maintain playback.
- Server Connection Errors: The DNS lookup times out or fails entirely, resulting in "Playback Failed," "HTTP 404," or "Check Internet Connection" errors within your IPTV player.
Switching to a premium, high-speed third-party DNS server resolves these issues by instantly retrieving IP addresses and routing your connection through the fastest, most optimal global pathways available.
Pro Tip: Upgrading your DNS is completely free, legal, and takes less than 5 minutes, making it the absolute best, most cost-effective way to boost your IPTV performance before you consider upgrading your internet plan.
2. The Mechanics of DNS and IPTV Buffering: A Deep Dive
To truly optimize your connection, it's vital to differentiate between bandwidth and latency, and understand how modern IPTV delivery networks actually function.
Bandwidth vs. Latency (Ping)
Many people mistakenly assume that upgrading their internet package from 100 Mbps to 1 Gbps fiber will magically solve all their IPTV buffering issues. However, if your latency is high, even a gigabit connection will buffer relentlessly.
- Bandwidth: The amount of data that can be transferred over your connection at one time. Think of this as the width of a highway. A 4K IPTV stream generally only requires about 25-30 Mbps of bandwidth.
- Latency (Ping): The time it takes for data to travel from your device to the server and back. Think of this as the speed limit on that highway.
DNS resolution time directly affects your latency. A slow DNS server adds precious milliseconds (or even full seconds) to every single request your IPTV app makes. High latency leads to delayed packet delivery, and in the world of live streaming, delayed packets mean the buffer empties faster than it fills, resulting in stuttering.
Routing Efficiency and Content Delivery Networks (CDNs)
Premium IPTV services, like the top-tier packages you can find by checking out our Pricing, utilize complex Content Delivery Networks (CDNs). A CDN stores copies of live streams and VOD content on servers located in data centers all around the world.
When you use an optimal DNS server (like Google DNS or Cloudflare), the DNS resolver uses EDNS Client Subnet (ECS) technology to determine your approximate geographic location. It then points your IPTV app to the absolute closest CDN server geographically. For instance, if you are in London, it points you to a London server.
Conversely, poor ISP DNS servers often lack proper routing tables. They might accidentally route a user in London to a streaming server in New York. The data now has to cross the Atlantic Ocean in real-time, drastically increasing latency, causing packet loss, and guaranteeing severe buffering.
How Different IPTV Protocols Interact with DNS
IPTV is delivered through various protocols, and DNS affects them differently:
- M3U Playlists: The most common format. M3U files contain thousands of individual links (URLs) for every channel. Every time you switch a channel, a new URL is queried against the DNS. Fast DNS is crucial for fast channel zapping on M3U lines.
- Xtream Codes API: The modern standard for IPTV apps (like Smarters or TiviMate). You log in with a URL, Username, and Password. The app constantly queries the portal URL to pull the EPG (Electronic Program Guide) and stream data. If the DNS cannot resolve the portal URL quickly, the app will freeze on the "Updating Channels" or "Updating EPG" screen.
- MAG Devices / Stalker Portal: These operate similarly to Xtream Codes but are highly sensitive to latency. High DNS response times on a MAG box will result in the portal failing to load entirely, often showing a yellow loading bar that gets stuck at 10%.
Bypassing ISP Throttling and Geo-Blocks
Some ISPs actively throttle (intentionally slow down) IPTV traffic. They do this to reduce network congestion or, maliciously, to push users toward their own expensive, outdated cable TV packages. They often identify this traffic via DNS requests.
While changing your standard DNS won't encrypt your traffic entirely (you absolutely need a VPN for complete encryption, as detailed in our comprehensive Security Guide), it can help bypass simple, lazy DNS-level blocks and routing manipulations imposed by your provider, especially during live sporting events.
3. The Top DNS Servers for IPTV Streaming Ranked & Reviewed
Now that you understand why you need to change your DNS, the next crucial question is: which DNS server should you actually use?
There are dozens of free, public DNS servers available across the internet, but a select few consistently dominate global performance benchmarks. Here is an exhaustive, detailed breakdown of the absolute best DNS servers for IPTV streaming in 2026.
1. Cloudflare (1.1.1.1) - The Undisputed Speed King
Cloudflare's 1.1.1.1 resolver is widely regarded by network engineers as the fastest public DNS resolver on the planet. Built heavily on the pillars of speed and privacy, Cloudflare operates a massive global network of edge servers that guarantees ultra-low latency lookups regardless of your geographic location.
- Primary DNS:
1.1.1.1 - Secondary DNS:
1.0.0.1 - Pros: Unmatched global speed, incredible uptime, high privacy standards (they explicitly pledge never to log your IP address or sell your data).
- Cons: Does not feature built-in ad blocking or malware filtering by default, which keeps it fast but less secure than others.
- Best For: Hardcore IPTV users whose primary goal is eliminating buffering, maximizing video bitrate stability, and reducing channel zap times to near-instantaneous levels.
2. Google Public DNS (8.8.8.8) - The Reliable Global Giant
Google's Public DNS is the most popular and widely used third-party DNS service globally. With Google's massive infrastructure backing it, it boasts incredible reliability and uses highly advanced routing techniques to connect you to the nearest, fastest IPTV streaming servers.
- Primary DNS:
8.8.8.8 - Secondary DNS:
8.8.4.4 - Pros: Highly reliable, perfectly optimized for routing to massive CDNs, rarely goes down, completely immune to localized ISP outages.
- Cons: Google does log some anonymized data for diagnostic purposes. If you are highly privacy-conscious, this might be a deterrent.
- Best For: General all-around performance, fixing routing issues causing regional buffering, and users who prioritize stability over absolute maximum privacy.
3. OpenDNS (Cisco) - The Security-Focused Alternative
Acquired by networking tech giant Cisco, OpenDNS offers an excellent balance of speed and enterprise-grade security. It actively blocks known malicious domains, phishing sites, and botnets at the network level, making it a great choice if you are concerned about the security of your home network.
- Primary DNS:
208.67.222.222 - Secondary DNS:
208.67.220.220 - Pros: Excellent uptime, built-in security features, customizable filtering (via OpenDNS Home dashboard allows you to block adult content across your entire home).
- Cons: Slightly slower lookup times than Cloudflare and Google, especially in more remote global regions.
- Best For: Families and users who want a reliable IPTV connection while also protecting their network from malicious websites and unverified IPTV apps.
4. Quad9 (9.9.9.9) - The Privacy & Malware Blocking Champion
Quad9 routes your DNS queries through a secure network of servers around the globe. It is a non-profit organization focused heavily on preventing connections to malicious hosts, all while maintaining strict user privacy.
- Primary DNS:
9.9.9.9 - Secondary DNS:
149.112.112.112 - Pros: Blocks phishing, malware, and spyware domains natively at the DNS level; strict no-logging policy verified by independent audits.
- Cons: The heavy real-time security filtering and threat-intelligence checks can occasionally add a few milliseconds to lookup times.
- Best For: Privacy-conscious users streaming on cheap, unverified Android boxes that might be prone to malware or shady background apps.
5. AdGuard DNS - The Built-in Ad Blocker
AdGuard DNS is unique because it acts as a "sinkhole," automatically blocking ads, cross-site trackers, and malicious domains across your entire network without you having to install any software. While premium IPTV services themselves don't usually have web ads, blocking background telemetry on your smart TV can free up valuable bandwidth.
- Primary DNS:
94.140.14.14 - Secondary DNS:
94.140.15.15 - Pros: System-wide ad blocking across smart TVs, phones, and PCs without needing extra software.
- Cons: Noticeably slower lookup times compared to Cloudflare; can sometimes aggressively block legitimate services or streaming CDNs.
- Best For: Users deeply annoyed by ads on their Smart TVs, mobile devices, and free VOD applications.
Ultimate DNS Server Performance Comparison Table
| DNS Provider | Primary IP | Secondary IP | Core Focus | Average Latency (Global) | Privacy Level | Malware Block |
|---|---|---|---|---|---|---|
| Cloudflare | 1.1.1.1 | 1.0.0.1 | Maximum Speed | ~13ms | High (No logs) | No |
| 8.8.8.8 | 8.8.4.4 | Reliability & CDN | ~22ms | Medium (Anonymized) | No | |
| OpenDNS | 208.67.222.222 | 208.67.220.220 | Security & Filtering | ~24ms | Medium | Yes |
| Quad9 | 9.9.9.9 | 149.112.112.112 | Privacy & Malware | ~40ms | High (No logs) | Yes |
| AdGuard | 94.140.14.14 | 94.140.15.15 | Ad Blocking | ~45ms | High | Yes |
(Note: Actual latency depends heavily on your physical geographic location and your proximity to the DNS provider's nearest edge datacenter. For sheer IPTV streaming performance, Cloudflare and Google generally perform the best worldwide.)
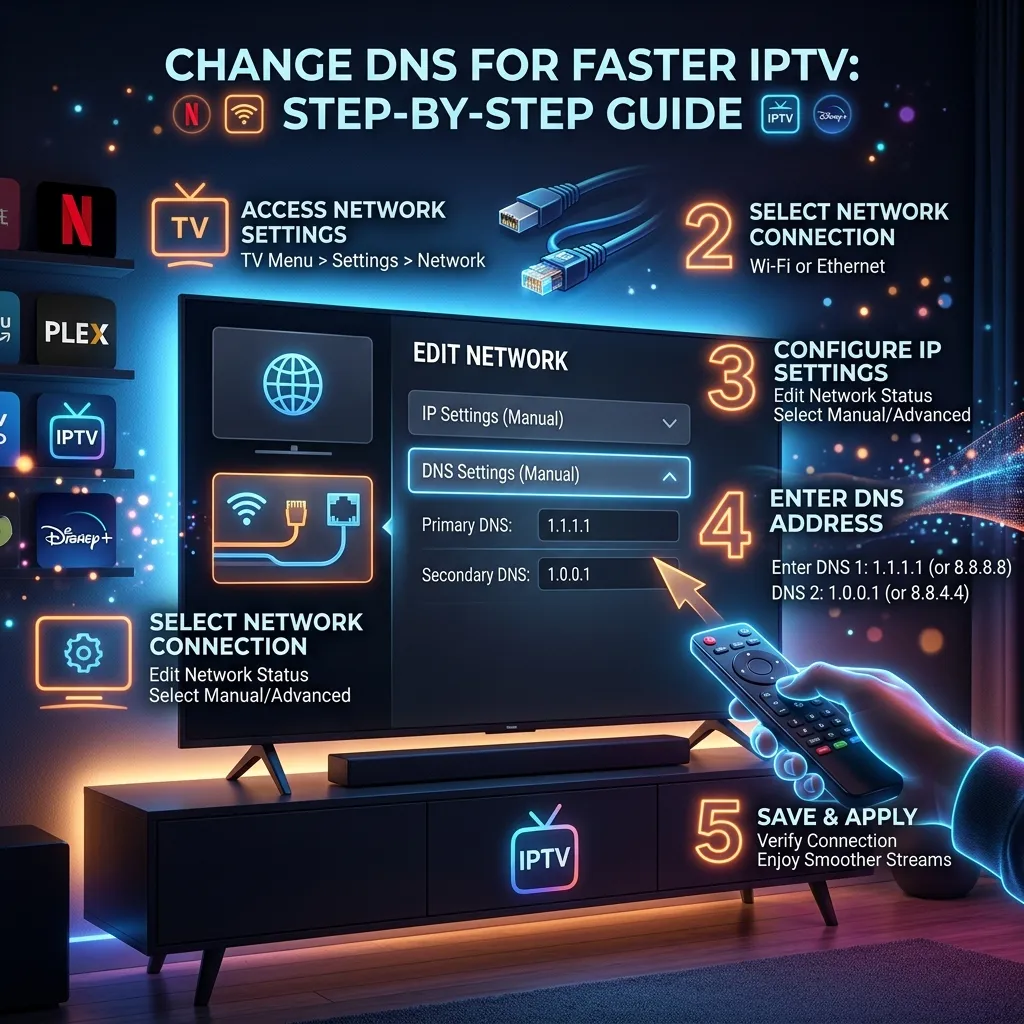
4. Step-by-Step Guide: How to Change DNS on Every Major Device
Changing your DNS settings is incredibly straightforward, though the exact steps vary wildly depending on the operating system and device you are using to stream. If you haven't yet set up your IPTV service, be sure to check out our comprehensive Installation Guide before proceeding with network tweaks.
Below, you will find exhaustive, meticulously detailed step-by-step instructions for changing your DNS on the most popular IPTV streaming devices in existence.
How to Change DNS on Amazon Firestick / Fire TV Cube
The Amazon Firestick is arguably the most popular device for IPTV due to its low cost and side-loading capabilities. For a complete guide on setting up your device for IPTV, see our dedicated Firestick Setup page. Here is how to tweak its DNS for max speed:
- Navigate to the Settings gear icon on the far right of the Firestick home screen.
- Select My Fire TV (on some models, it is listed as Device & Software).
- Go to About -> Network.
- Crucial Step: Write down your current IP Address (e.g., 192.168.1.15) and your Gateway (e.g., 192.168.1.1). You will need these numbers in a moment.
- Hit the back button to return to the main Settings menu and select Network.
- Highlight your currently connected Wi-Fi network and press the Menu button (the button with three horizontal lines) on your remote to "Forget" the network. Confirm by pressing Select.
- Select your network name again to reconnect.
- Enter your Wi-Fi password carefully, but DO NOT click Connect yet. Instead, navigate down and click on Advanced.
- Enter the IP Address you wrote down earlier exactly as it was, and click Next.
- Enter the Gateway IP you wrote down and click Next.
- Enter
24for the Network Prefix Length (unless you have a highly custom home network subnet, 24 is the standard for home routers) and click Next. - Now, you will be prompted for DNS 1. Enter your chosen primary DNS (e.g.,
1.1.1.1). - For DNS 2, enter the secondary DNS (e.g.,
1.0.0.1). - Click Connect. Your Firestick is now using high-speed DNS and bypassing your ISP!
How to Change DNS on Android TV & Android Boxes (Nvidia Shield, Chromecast with Google TV)
Android-based devices, including high-end boxes like the Nvidia Shield TV Pro and Formuler boxes, offer a very streamlined process for modifying network settings.
- From the main Android TV home screen, go to the top right and click Settings (the gear icon).
- Select Network & Internet.
- Click on your active connection (your Wi-Fi SSID name or Ethernet).
- Scroll down the menu and select IP Settings.
- Change the setting from DHCP (automatic) to Static.
- Enter your device's current IP address (usually displayed on the previous screen) and gateway.
- Keep the Network Prefix Length at
24. - Enter your new primary DNS 1 (e.g.,
8.8.8.8) and secondary DNS 2 (e.g.,8.8.4.4). - Save the settings. Highly Recommended: Restart your Android box entirely to flush the old DNS cache and force it to use the new settings immediately.
How to Change DNS on Samsung Smart TVs (Tizen OS)
Samsung TVs are fantastic for built-in IPTV apps like IPTV Smarters Pro, IBO Player, or SET IPTV. Here is how to speed them up and reduce app loading times:
- Press the Home button on your Samsung remote and navigate left to Settings.
- Navigate down to the General tab -> select Network.
- Select Network Status. Wait for it to check the connection.
- At the bottom of the status screen, click on IP Settings.
- Scroll down to DNS Setting and change it from "Enter automatically" to "Enter manually".
- A new numerical field labeled DNS Server will appear. Enter your preferred primary DNS (e.g.,
1.1.1.1). - Click OK to save and exit the menu. (Note: Samsung Tizen OS generally only allows you to input one primary DNS server via the UI, which is fine, but it limits redundancy if that single server goes down).
How to Change DNS on LG Smart TVs (webOS)
LG TVs with webOS have a very intuitive network management interface, making this process quick and painless.
- Press the Settings (gear) button on your LG Magic Remote.
- Select All Settings (the icon with three vertical dots at the bottom of the quick menu).
- Navigate to Connection -> Network Connection Settings.
- Select your active connection (Wi-Fi Connection or Wired Connection).
- Click on Advanced Wi-Fi Settings (or just Advanced Settings if using Ethernet).
- Uncheck the green toggle box that says "Set Automatically".
- Scroll down to the DNS Server field.
- Use the on-screen keyboard to enter your new DNS address (e.g.,
8.8.8.8) and click Connect.
How to Change DNS on Apple TV 4K
The Apple TV 4K is a premium, high-horsepower device that handles extremely high-bitrate 4K IPTV streams flawlessly—provided the DNS routing is fast enough to keep the buffer full.
- Open the Settings app from the Apple TV tvOS home screen.
- Select Network.
- Choose your active network underneath the connection status (Wi-Fi or Ethernet).
- Select Configure DNS.
- Change the setting from Automatic to Manual.
- Enter your new primary DNS address. Note: The Apple TV interface requires you to fill in all three digits for each IP segment. So, for Cloudflare, you must enter
001.001.001.001. For Google, enter008.008.008.008. - Click Done and exit the settings menu. Restart the Apple TV.
5. Changing DNS on Your Router (The Ultimate "Set It and Forget It" Solution)
Changing the DNS on individual streaming devices is great, but changing it at the router level is the ultimate "set it and forget it" master solution. By updating your home router's DNS, every single device connected to your home network—including your smart TVs, smartphones, gaming consoles, tablets, and Firesticks—will automatically benefit from the faster DNS without needing individual configuration.
While router firmware interfaces vary wildly by brand, the core steps remain conceptually the same.
General Steps for Most Routers:
- Find your router's IP address (the Default Gateway). It is almost always
192.168.1.1,192.168.0.1, or10.0.0.1. - Type this IP address into the address bar of a web browser on a computer or phone connected to the network.
- Log in with your admin credentials (often found on a sticker on the back/bottom of the router, or defaults like admin/admin).
- Look for a section labeled WAN, Internet, Network Setup, or DHCP Server Settings.
- Locate the text fields for Primary DNS and Secondary DNS.
- Enter
1.1.1.1and1.0.0.1(or your preferred DNS pair). - Click Save or Apply.
- Crucial Step: Reboot your router entirely. This forces the router to flush its internal DNS cache and forces all connected devices to lease the new DNS settings upon reconnecting.
Brand-Specific Router Tips:
- Asus (AsusWRT): Go to WAN -> Internet Connection -> scroll down to "WAN DNS Setting". Set "Connect to DNS Server automatically" to NO, and enter the IPs.
- TP-Link: Go to Advanced -> Network -> Internet. Click "Advanced" drop-down. Select "Use the following DNS Addresses" and enter the IPs.
- Netgear (Nighthawk): Go to Basic -> Internet. Select "Use these DNS Servers" and enter the IPs. Click Apply.
- Eero / Google Nest Mesh: These modern mesh systems do not use traditional web interfaces. You must open their respective smartphone apps, go to Advanced Settings / Network Settings, find Custom DNS, and enter the IPs there.
6. How to Flush Your DNS Cache
Sometimes, simply changing the DNS numbers isn't enough. Your device or router might hold onto old, slow, or broken IP addresses in its local memory cache. Flushing the DNS cache forces the device to query the new, fast DNS servers immediately.
- On a Router: The simplest and most effective way is to perform a hard reboot. Unplug the router from the wall, wait 60 seconds, and plug it back in.
- On a Smart TV / Firestick / Android Box: Perform a full system restart from the settings menu. Simply turning the TV off and on with the remote usually just puts it to sleep and does not flush the cache. Unplug the device from the wall for 30 seconds for a true power cycle.
- On Windows PC: Open Command Prompt as Administrator and type:
ipconfig /flushdns - On Mac: Open Terminal and type:
sudo dscacheutil -flushcache; sudo killall -HUP mDNSResponder
7. Testing and Verifying Your New DNS Connection
After you have applied the new DNS settings and flushed your caches, you shouldn't just assume it is working perfectly. It is highly recommended that you verify the changes and mathematically test the performance improvements.
Step 1: Verify the DNS Change (The DNS Leak Test)
To ensure your streaming device is actually using the new DNS and hasn't silently defaulted back to your ISP's garbage servers, perform a DNS leak test.
- Open a web browser on your streaming device (or a smartphone connected to the same Wi-Fi network).
- Go to the website
dnsleaktest.com. - Click on Standard Test.
- Look at the results under the "ISP" column. If you set your DNS to Cloudflare, the results should prominently say "Cloudflare". If it still lists your local ISP (e.g., Comcast, BT), your DNS settings were not applied correctly, and you need to review the steps above.
Step 2: The Latency Ping Test
You want to ensure your new DNS is actually faster in your specific city. While it's hard to ping directly from a Smart TV, you can test it accurately on a PC or Mac connected to the same network.
- Windows: Open Command Prompt and type
ping 1.1.1.1(or whatever DNS you chose) and hit Enter. Look at the "Time=Xms" value. The lower the number, the better. - Mac: Open Terminal and type
ping 1.1.1.1.
Compare the ping of Cloudflare (1.1.1.1) against Google (8.8.8.8). Stick with whichever one provides the lowest average millisecond response time. If Google gives you 15ms and Cloudflare gives you 40ms, Google is the better choice for your specific home.
Step 3: The Ultimate IPTV Stress Test
The true test is in the streaming performance itself. Open your favorite IPTV application.
- Zap Test: Try "zapping" (switching) between 10 different live channels rapidly. Measure how long it takes for the video and audio to initiate on each channel.
- VOD Test: Load up a massive, high-bitrate 4K VOD movie file. Fast forward directly to the middle of the film and see how quickly the buffer fills and playback resumes.
- Peak Hour Test: Watch a live sporting event during prime time peak hours (Saturday 3 PM UK time, or 8 PM - 10 PM US time) and monitor for micro-stuttering.
If you followed the guide meticulously, you should notice a massive, tangible reduction in load times and a much smoother viewing experience.
8. Common DNS Issues and Advanced Troubleshooting
While changing your DNS is generally a smooth, painless process, networking can sometimes be finicky. Here is how to solve the most common advanced problems.
Issue: "No Internet Connection" or "Cannot Resolve Host" After Changing DNS
If your device suddenly loses all internet connectivity entirely after making the change, you almost certainly made a typo when inputting the IP address, Gateway, or DNS server.
The Fix: Go back into the network settings and double-check every single digit. If you assigned a static IP, ensure it doesn't conflict with another device on your network (e.g., don't assign .50 if your roommate's PlayStation is already using .50). When in doubt, switch back to DHCP/Automatic, let the device grab a fresh IP, note it down precisely, and try the manual entry process again.
Issue: Streaming Still Buffers Severely During Peak Hours
If you successfully changed your DNS, and your speed tests look great, but you are still experiencing crippling buffering specifically between 7 PM and 11 PM, the issue might not be DNS latency at all. It is highly likely that your ISP is actively throttling IPTV traffic during peak hours using Deep Packet Inspection (DPI), or your ISP's backbone routing to the overseas IPTV servers is simply congested. The Fix: In this specific scenario, DNS alone won't save you. You must encrypt your traffic. Read our comprehensive Security Guide to learn how implementing a high-speed VPN alongside your new DNS can completely hide your streaming activity from your ISP, rendering their throttling algorithms useless.
Issue: ISP DNS Hijacking (Transparent DNS Proxying)
Some highly restrictive ISPs (especially in the UK, Australia, and parts of the US) use a nasty, aggressive tactic called "Transparent DNS Proxying." Even if you configure your router or Firestick perfectly to use 1.1.1.1, the ISP intercepts your DNS requests on port 53 and forcefully reroutes them through their own slow, censored servers anyway without telling you.
The Fix: To defeat transparent proxying, you need to utilize DNS over HTTPS (DoH) or DNS over TLS (DoT). These modern protocols encrypt your DNS requests entirely, making it impossible for the ISP to intercept or read them. While natively setting this up on a Smart TV is difficult, many modern routers (like Asus and Eero) allow you to enable DoH or DoT directly in the router's firmware settings. Alternatively, running a high-quality VPN automatically resolves DNS requests through the VPN's encrypted tunnel, entirely bypassing the ISP's proxy.
9. Smart DNS vs. VPN: What is the Real Difference for IPTV?
We frequently receive questions about the difference between changing standard DNS, using a paid "Smart DNS" service, and using a VPN. It is critical to understand the distinction to optimize your home theater setup correctly.
Standard DNS (Google, Cloudflare)
- What it does: Translates domain names to IP addresses quickly and efficiently.
- Speeds: Maximum potential speeds (absolutely zero encryption overhead).
- Unblocking: Cannot bypass complex regional geo-blocks (like Netflix regions) or advanced ISP throttling.
- Cost: 100% Free.
Smart DNS Proxy Services
- What it does: Similar to standard DNS, but when it detects traffic meant for geo-blocked streaming services (like BBC iPlayer, Netflix US, Hulu, or specific regional sports networks), it reroutes only that specific traffic through a proxy server in the correct country.
- Speeds: Very fast, as it doesn't encrypt the heavy video stream itself.
- Unblocking: Excellent for bypassing geo-blocks on major corporate VOD platforms.
- Cost: Usually requires a paid monthly subscription (around $3-$5/mo).
Virtual Private Network (VPN)
- What it does: Encrypts 100% of your internet traffic from your device and routes it through a highly secure server in a geographic location of your choosing. It includes its own secure, encrypted, leak-proof DNS.
- Speeds: Slight reduction in maximum bandwidth due to heavy AES-256 encryption overhead, but massively improves actual streaming speeds if your ISP is illegally throttling IPTV.
- Unblocking: Unblocks absolutely everything, hides activity completely from ISPs, prevents throttling, and stops transparent DNS proxies dead in their tracks.
- Cost: Paid subscription required (around $5-$10/mo).
The Verdict for IPTV Users: If your only issue is slow channel loading times and minor buffering, simply change to a free Standard DNS (Cloudflare) using this guide. If you are facing strict ISP blocking (like the Premier League blocks in the UK), heavy throttling, or live in a country with aggressive digital copyright surveillance, you absolutely must use a VPN.
10. Beyond DNS: Holistic Network Optimization for IPTV
Changing your DNS is a massively important foundational step, but building the ultimate, buffer-free home theater requires a holistic approach to your local network. Here are the other critical, non-negotiable steps you must take to guarantee flawless 4K streaming.
1. Ditch the Wi-Fi; Hardwire Everything
Wi-Fi is convenient for phones and laptops, but it is the absolute enemy of live IPTV streaming. Wi-Fi signals are subject to severe interference from walls, microwaves, Bluetooth devices, and your neighbor's overlapping routers. This interference causes "packet loss"—data packets that disappear into the ether and have to be re-sent, resulting in instant buffering on live TV.
The Fix: Run a Cat6 Ethernet cable directly from your router to your streaming device. Period. If your device (like a Firestick) doesn't have an Ethernet port natively, buy a cheap OTG Ethernet adapter on Amazon. If your router is in another room and running a wire is impossible, invest in a high-quality Powerline Ethernet Adapter or a dedicated Mesh Wi-Fi system with a dedicated wireless backhaul band. A wired connection guarantees a consistent, flawless data flow, perfectly complementing your newly optimized DNS.
2. Upgrade Your Aging Streaming Hardware
If you are trying to stream high-bitrate, 60fps 4K sports on a 6-year-old cheap Android box you bought off eBay, or an outdated first-generation smart TV, no amount of DNS tweaking will save you. The internal CPU and RAM in older devices physically cannot decode modern video codecs (like HEVC/H.265) fast enough, leading to device-level stuttering that looks exactly like internet buffering.
The Fix: Upgrade to modern, capable hardware. The Nvidia Shield TV Pro remains the undisputed, heavyweight king of IPTV streaming hardware. Alternatively, the Amazon Fire TV Stick 4K Max, Apple TV 4K, and Google Chromecast with Google TV offer fantastic processing power for handling demanding IPTV apps seamlessly on a budget.
3. Choose a Premium, High-Quality IPTV Provider
The harsh, unavoidable truth of the IPTV industry is this: if the servers hosting the IPTV streams are overloaded, cheap, and running on poor infrastructure, you will experience buffering even with a 10-Gigabit fiber connection and Cloudflare DNS. Many cheap IPTV resellers cram thousands of users onto single servers to maximize profits, resulting in unbearable lag during big pay-per-view sporting events.
The Fix: You need an IPTV provider that invests heavily in robust Anti-Freeze technology, global load-balancing, and high-bandwidth CDN delivery networks. That is exactly what we provide at Smartiflix. To experience the staggering difference that premium infrastructure makes, explore our premium IPTV Subscription packages and view our transparent, affordable Pricing plans. We utilize enterprise-grade servers specifically designed to handle massive high-traffic events without breaking a sweat.
4. Optimize Your Router QoS Settings
Aside from changing the DNS, ensure your router is actively configured to prioritize streaming data:
- Enable QoS (Quality of Service): Log into your router's admin panel and enable QoS. Set your specific streaming device (by finding your Firestick or Apple TV's MAC address) to the "Highest Priority." This ensures that if someone else in the house starts downloading a massive 100GB video game update, the router will forcefully prioritize bandwidth to your IPTV stream, preventing sudden, unexpected buffering.
- Change Wi-Fi Channels: If you absolutely must use Wi-Fi, use an app like WiFi Analyzer on your smartphone to find the least congested 5GHz channel in your neighborhood and manually set your router to broadcast on that specific channel.
- Update Router Firmware: Outdated router firmware can cause massive routing inefficiencies and memory leaks. Always ensure your router is running the latest update.
11. Conclusion: Banish Buffering and Reclaim Your TV
Buffering is the absolute bane of the modern cord-cutter's existence, but as you have learned today, it is rarely an unsolvable problem. By moving away from your ISP's slow, congested, and monitored default servers and switching to a high-performance DNS resolver like Cloudflare (1.1.1.1) or Google (8.8.8.8), you are essentially upgrading your entire internet's navigation system.
The results speak for themselves: dramatically faster channel zap times, virtually non-existent micro-stuttering, rapid VOD loading, and a vastly improved overall IPTV experience.
Take the five minutes to apply the exact settings outlined in this guide to your router or your specific streaming device. Combine your new, blazing-fast DNS with a hardwired Ethernet connection, modern streaming hardware, and a premium, high-capacity service from the Smartiflix Homepage, and you will never miss a crucial goal, a knockout punch, or a pivotal movie moment due to a spinning buffer wheel ever again.
12. Frequently Asked Questions (FAQ)
Q: Will changing my DNS increase my raw internet bandwidth speed? A: No. Changing your DNS does not increase the raw bandwidth pipeline (e.g., your download speed will not magically jump from 100Mbps to 500Mbps). It reduces latency and resolves server addresses much faster, meaning streams start quicker and maintain a more stable connection, which effectively eliminates the root cause of most buffering.
Q: Is changing my DNS legal, or will I get in trouble with my ISP? A: Changing your DNS is 100% legal worldwide. You are simply choosing which public directory your computer uses to look up website addresses. ISPs allow this, and many IT professionals recommend doing it immediately upon setting up a new home network for security and speed reasons.
Q: Can a new DNS bypass geo-blocking so I can watch content from other countries? A: Standard DNS (like Google or Cloudflare) will not bypass strict geographic restrictions imposed by streaming services. For that, you need a specialized Smart DNS proxy service or a full Virtual Private Network (VPN).
Q: I changed my DNS on my Firestick to Cloudflare, but it actually feels slower. What happened? A: Occasionally, the "fastest" global DNS might have poor routing to your specific local ISP exchange due to peering agreements. If Cloudflare (1.1.1.1) feels slow in your specific neighborhood, simply try switching to Google (8.8.8.8) or OpenDNS (208.67.222.222). Additionally, ensure you rebooted your device entirely after making the change to clear the old DNS cache.
Q: Should I change the DNS on my Smart TV, or should I change it on my Router? A: If you only use one specific device for streaming TV, changing it directly on the TV/Firestick is perfectly fine. However, changing it at the router level is highly recommended by networking experts because it automatically applies the faster DNS to every single device in your home without needing to configure them all individually.
Q: Does Smartiflix support custom DNS connections and VPNs? A: Yes, absolutely! Our IPTV infrastructure is fully compatible with all third-party DNS servers and all major VPN providers. In fact, we actively encourage our users to optimize their network setups using guides like this to get the absolute best performance from our service. Check out our IPTV Subscription page to get started with a premium, buffer-free connection today.